 Alpha_1 User's Manual
Alpha_1 User's Manual
Alpha_1 User's Manual
The main features of these programs are:
motif3d [-displaymode x11]The "-displaymode x11" option can used on a SGI machine when the X DISPLAY variable is set to a remote host that is not an SGI. Otherwise, the motif3d will use the hardware assisted GL display driver on SGI machines.
	csh 1> setenv A1SHOST another-machine
	csh 2> motif3d &
viewa1 [-displaymode x11] files...The "-displaymode x11" option is the same as described above. The "files" are names of Alpha_1 binary or text files. If the first object read is a viewing transformation it is used to set the initial viewpoint.
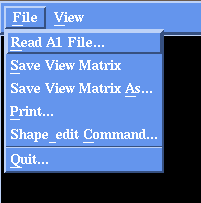
- Read A1 File...
- Read objects from a file and display them.
- Save View Matrix
- Save the current view transformation (viewpoint) in a file named mat.a1
- Save View Matrix As...
- Save the viewpoint in a file of the users choosing
- Print...
- Print the contents of the window using Postscript
- Shape_edit Command...
- Send a single SCL command to c_shape_edit (motif3d only)
- Quit...
- Exit the program. Must confirm via a dialog box
- Clear
- Clear the window
- Unshow
- Unshow the selected objects
- Select All
- Select everything
- Viewing Parameters...
- Pop up the Viewing Parameters dialog box
- Preview Animation...
- Pop up the Preview Animation dialog box
- Thick lines
- Use thicker lines (SGI only, applies to all objects)
 (view
external image)
(view
external image)
There are three sections to the control panel:
- Viewing Mode
- The set of "radio button" at the top selects the viewing mode for interactive manipulation. Only one "mode" can be selected at once. This mode determines the actions take when the middle mouse button is dragged in the 3D viewing window.
- Scale - Globally scale the objects. Move the mouse left (for smaller) and right (for larger).
- Pan and Zoom - First move the point where the mouse is clicked to the center of the screen, then scale as the mouse is dragged. Scaling works the same as "Scale" mode.
- XY Pan - Apply X and Y translations following the mouse.
- XY Rotate - Apply X and Y rotations following the mouse. This makes the mouse act similar to a track-ball or joystick. Moving the mouse left and right rotates around the Y axis, and moving the mouse up and down rotates about the X axis.
- Z Rotate - Rotate around the Z axis. Moving the mouse to the right causes a positive rotation, and left causes a negative rotation.
- Hither - Move the "hither" (near) clipping plane. Objects are clipped against two planes parallel to the XY plane. Moving the mouse to the right moves the plane closer to the viewer, left moves it away from the viewer.
- Yon - Move the "yon" (far) clipping plane.
- Predefined Viewpoints
- The middle set of buttons are for selecting predefined viewpoints. The first group is:
The next set of buttons are the 6 traditional engineering views (top, right, etc.).
- Reset - Set the viewing transformation to the default.
- Center - Center all the objects in the window.
- Selected - Center only the selected objects.
The last two buttons are for user-defined views:
- Save - Save the current viewpoint.
- Restore - Restore the previously saved viewpoint.
- Other Options
- The last part of the panel has pushbuttons for some other options.
The last two performance options are rarely required on current workstations except for extremely complicated models.
- Perspective - Turns perspective on or off.
- Continuous - Turns continuous drawing on or off. Normally, when the middle mouse is dragged, the window is redrawn continuously (as fast as possible) until the mouse button is let up. If performance is a problem, continuous display can be turned off. This will cause the window only to be redrawn when the mouse button is let up.
- Fast Display - Turn fast display on or off. Another option when performance is a problem (default is off). The option displays all objects as a "bounding box" during continuous viewing operations to speed up the display. This can actually make things worse in many instances.
 (view
external image)
(view
external image)
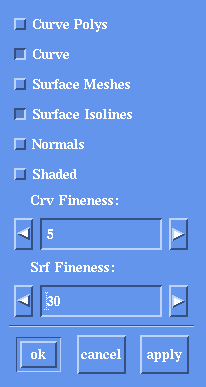
The operations are described in the following:
- Curve Polys
- Display control polygons of curves.
- Curve
- Display curves as smooth lines.
- Surface Meshes
- Display control meshes of surfaces.
- Surface Isolines
- Display isoparametric lines of surfaces.
- Normals
- Display normals near the four corners of a surface as arrows in the direction of the normal with base on the surface. This can be useful for checking orientation of surfaces.
- Shaded
- Display shaded surfaces (SGI only).
- Crv Fineness
- (5.0) Set the fineness value for smooth curve display. Smaller values will produce smoother curves (more line segments) and larger values will produce coarser representations (fewer line segments). This also affects isoparametric lines. Use the arrow, or edit the numbers directly to modify.
- Srf Fineness
- (30.0) Set the fineness value for the spacing of isoparametric lines in surface display. Smaller values will produce more isoparametric lines and larger values will produce a coarser representation with fewer isoparametric lines.
- ok
- Apply the changes and close the dialog box.
- cancel
- Don't apply any changes and close the dialog box.
- apply
- Apply the changes but leave the dialog box open.
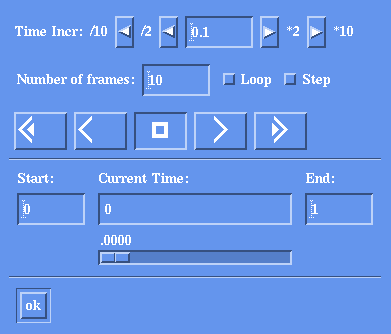
The top row can be used to adjust the time increment between steps,
effectively changing the number of frames that are displayed. The
"Number of frames:" box can be set explicitly as well. The "Loop"
button will cause the animation to play continuously (when "play" is
pushed). The next row are the "VCR" buttons, "rewind," "reverse play,"
"stop," "play," and "fast forward.". The bottom section is used to
select the overall time interval. The slider bar can be used to
manually change the current time.
 Alpha_1 User's Manual Home Page