 Alpha_1 User's Manual
Alpha_1 User's Manual
Alpha_1 User's Manual
tk3d [-displaymode {X11|GL|OpenGl}] [-connect] [[-o objname] ...] [[-a file.a1] ...]
Command-line options are explained below:
csh 1> setenv A1SHOST another-machine
Then type the following to connect tk3d to the c_shape_edit process on
the remote machine.
csh 2> tk3d -connect &
To remove the toolbar from the viewing window allowing added screen space, click a button in the Options menu.

Viewing Modes
Menus
 The menus have basically the same set of options as motif3d/viewa1,
although some are in different places or have slightly different
names. One new feature of the Tcl/Tk menubar is that the menus are
tear-off menus. Each menu has a dashed line at the top. If you select
this line, the menu is torn off and presented in a separate window
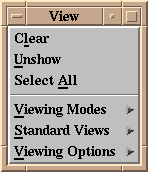
that persists. For example, here is the View menu "torn off":
The menus have basically the same set of options as motif3d/viewa1,
although some are in different places or have slightly different
names. One new feature of the Tcl/Tk menubar is that the menus are
tear-off menus. Each menu has a dashed line at the top. If you select
this line, the menu is torn off and presented in a separate window
that persists. For example, here is the View menu "torn off":
Tk3d menus and menu options are described below.
- Read A1 File...
- This option reads objects from a file and displays them.
- Save A1 File...
- This option saves objects to a file.
- Save View Matrix
- This option saves the current view transformation (viewpoint) in a file named mat.a1.
- Save View Matrix As...
- This option saves the viewpoint in a file of the your choosing.
- Print...
- This option prints the contents of the window using Postscript.
- Read Model View...
- This option reads a viewpoint file
- Save Model View...
- This option saves the viewpoint to a file of the users choosing.
- Quit...
- This option exits the program.
- Undo
- Undo the previously performed operation.
- Redo
- Redo the previously performed operation.
- Save
- Saves the current viewpoint.
- Restore
- Restores the previously saved viewpoint.
- Clear
- This option clears the viewing window of all objects.
- Unshow
- This option unshows the selected objects.
- Select All
- This option selects all objects in the viewing window.
- Viewing Modes
- The viewing modes are the same as in the toolbar with the addition of:
- Zoom - This mode enables zooming using a specified bounding box.
- Hither - This mode moves the "hither" (near) clipping plane. Objects are clipped against two planes parallel to the XY plane. Moving the mouse to the right moves the plane closer to the viewer, left moves it away from the viewer.
- Yon - This mode moves the "yon" (far) clipping plane in the same manner as the Hither clipping plane.
- Standard Views
- The standard views are the same as in the toolbar
- Viewing Options
- Perspective - This option turns perspective on or off.
- Continuous - This option turns continuous drawing on or off. Normally, when the middle mouse is dragged, the window is redrawn continuously (as fast as possible) until the mouse button is let up. If performance is a problem, continuous display can be turned off. This will cause the window to be redrawn only when the mouse button is let up.
- Fast Display - This option turns fast display on or off. When on, all objects are displayed as bounding boxes during continuous viewing operations to speed up the display. This can actually cause worse performance in many instances.
- Depthcueing - This option turns depthcueing on or off. When on, objects will appear to fade away as they are distanced from the viewpoint.
Note: Continuous and fast display performance options are rarely required on current workstations except for extremely complicated models.
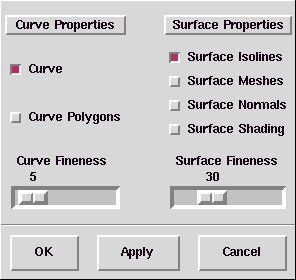
Curve & Surface Properties ...
- Selecting the Curve & Surface Properties ... item from the Options menu pops up a dialog box. This dialog box allows editing of curve and surface properties. The dialog box looks like this:
Options in the dialog box are explained below:
Curve Properties
Surface Properties
- Curve - This option displays curves as smooth lines.
- Curve Polygons - This option displays the control polygons of curves.
- Curve Fineness - (5.0) This option sets the fineness value for smooth curve display. Smaller values will produce smoother curves (more line segments) and larger values will produce coarser representations (fewer line segments). This also affects isoparametric lines. Use the slider bar to modify fineness values.
- Surface Isolines - This option displays isoparametric lines of surfaces.
- Surface Meshes - This option displays the control meshes of surfaces.
- Surface Normals - This option displays normals near the four corners of a surface as arrows in the direction of the normal with base on the surface. This can be useful for checking orientation of surfaces.
- Surface Shading - This option allows display of shaded surfaces (SGI machines only).
- Surface Fineness - (30.0) This option sets the fineness value for the spacing of isoparametric lines in surface display. Smaller values will produce more isoparametric lines and larger values will produce a coarser representation with fewer isoparametric lines. Use the slider bar to modify fineness values.
- Ok
- Clicking on this button will apply any changes and close the dialog box.
- Apply
- Clicking on this button will apply any changes but leave the dialog box open.
- Cancel
- Clicking on this button won't apply any changes and will close the dialog box.
 Alpha_1 User's Manual Home Page