 Alpha_1 User's Manual
Alpha_1 User's Manual
Alpha_1 User's Manual
M-x set-scl-pgmWhen prompted, type shape3d. To make this your default, add the following lines to your ~/.emacs file:
   ;; Use new Tcl/c_shape_edit program
   (set-scl-pgm "shape3d")
shape3d [file.tcl] [-tcl] [-displaymode {X11|GL|OpenGl}]
The command-line options are described below:
NOTE: If you have any text selected (anywhere) and do an unshow, shape3d will paste the text and not perform the command.
 Shape3d is a prototype of what is called a "multi-mode" interface. It
combines graphical and command language interfaces into one
application. The basic philosophy is to combine the strengths of
graphical and command language interfaces, thus allowing the user to
create, edit, select, etc. in whatever form is most convenient.
Shape3d is a prototype of what is called a "multi-mode" interface. It
combines graphical and command language interfaces into one
application. The basic philosophy is to combine the strengths of
graphical and command language interfaces, thus allowing the user to
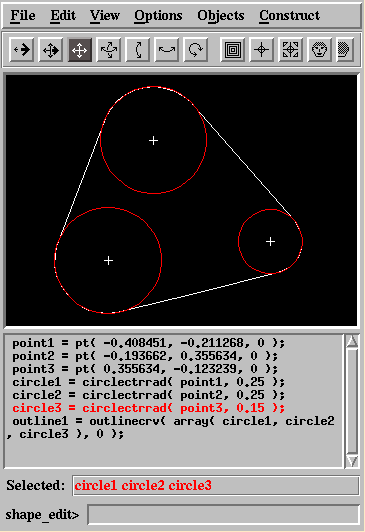
create, edit, select, etc. in whatever form is most convenient. The current implementation is only a prototype, but below is some basic documentation on what it does. To the right is an image of the application with a very simple model being constructed.
The shape3d multi-mode interface contains four main parts. They are:
1. Toolbar and menubar.
2. Standard viewing window.
3. Scl text view window.
4. Graphical interface for constructions.
These four parts are explained in greater detail in the sections below.

- Read A1 file
- This option reads and displays general Alpha_1 objects (not dependency graphs).
- Read SCL File
- This option reads Scl code from a file into the scl code window.
- Restore Model
- This option restores model dependency graphs from a .a1 file. This option can be used for general .a1 files also. Equivalent to Scl restoreModel command.
- Save A1 file
- This option is equivalent to the Scl dumpA1File command for the selected objects.
- Save Model
- This option is equivalent to the Scl saveModel command for the selected objects.
- Save SCL
- This option saves the Scl code window text to a file.
- Load Model View...
- This option loads a viewpoint file.
- Save Model View...
- This option saves the viewpoint in a file of the users choosing.
- Quit...
- This option exits the program.
- Editing Curves...
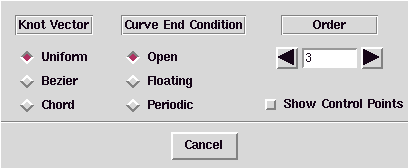
Selecting the Editing Curves ... item from the Options menu pops up a dialog box. This dialog box allows manipulation of the Knot Vector, Curve End Condition and Order of a selected curve. There is also a button to show/unshow the control points of the curve. Below is a picture of the Editing Curves ... dialog box.
The Editing Curves ... dialog box options are used to manipulate the selected curve as described below:
- Knot Vector
- Below the Knot Vector submenu are three buttons that allow you to change the knot vector of the curve.
- Curve End Condition
- Below the Curve End Condition submenu are three butons that allow you to change the end conditions of the curve.
- Order
- Below the Order submenu is a entry box and arrow buttons that allow you to change the order of the curve. You may directly type into the entry box or use the arrow buttons to raise/lower the order of the curve.
- Show Control Points
- This button controls whether the control points of the curve are displayed in the viewing window or not.
- SCL Demand eval
- If selected, this option delays recomputing objects until required. For example, complicated objects generally will not be recomputed by dependency propagation if not shown in the viewing window.
- SCL Trace Dependencies
- If selected, c_shape_edit will trace all dependency changes and print them to standard output.
Objects Menu
Use the Objects menu to show the predefined objects provided in c_shape_edit.Construct Menu
Use the Construct menu to create objects graphically. The simplest construction is to create points with the right mouse button. Other constructions require one or more objects to be selected and then a menu item chosen from the Construct menu. The Construct menu is a cascading menu with submenus for different types of constructors. Currently, there are points, anchors, lines, vectors, circles, curves, surfaces, volumes and transformations submenus.To create a line through two points, for example, select two points in the viewing window and pick "Two points" from the Lines submenu. The new object will automatically be shown in the graphics window and its Scl code will appear at the bottom of the Scl code window.
Some constructors require text input in addition to the selected objects. For example, "Line point angle" requires a selected point and an angle. A dialog box appears to prompt for the angle. A constant or named dimension can be provided in this case. Other constructors require only text input and prompt via a dialog box.
Under the current implementation, if the objects in the selected set do not match the arguments required for the constructor, then nothing will be done. For example, if you try to create a line through two points with a line and a point in the selected set, it will not work.
Below is a list of all the constructors currently supported in the construct menu. Each is linked to its corresponding c_shape_edit command. Click on the links for more information about constructor number of arguments, argument types, etc.
Points Anchors Lines
Vectors Circles Curves Surfaces Volumes Transformations
- Two points
- Point angle ...
- Point vector
- Horizontal ...
- Vertical ...
- Offset ...
- Tangent Cir at Angle ...
- Point parallel
- Point circle
Text View Window
The bottom section of the shape3d multi-mode interface is for viewing and editing Scl code. To the right is a picture of the Text View Window. There are three parts to this window: 1) the Scl code window, 2) the selected objects list, and 3) the Scl command input window (one line). These parts are explained below.
Scl Code Window
The Scl code window displays the Scl code for all the objects c_shape_edit knows about. (The built-in objects, unitcircle etc., are left out.) Shape3d assumes everything is constructed through the graphical interface (which includes the Scl text input windows). However, this is not a workable assumption at this point since the editing and I/O facilities for the text window are not sufficiently powerful to allow efficient editing.The standard terminal input via emacs can be used for input and editing until the graphical interface is developed further. When the Scl is entered via emacs, the Scl code window will not show all the Scl code unless it is forced to refresh. This can be accomplished at any time by clicking the mouse in the Scl command input window and pressing Return.
The Scl code window allows editing and new constructions. Click the mouse (button 1, normally the left mouse button) in the window to begin editing. The window is line-based and assumes that each line contains a valid Scl command, so inserting new lines in the middle of statements will not work. When you are done editing a line, just press Return anywhere on the line to evaluate the changes. Arbitrary Scl can be entered this way, but side-effect functions such as show (foobar), will disappear after they are evaluated. The Scl code window only displays Scl code for constructed objects.
You can also use the Scl code window to show and unshow objects by name. This is described above in the Text View Window key and mouse bindings section.
Selected Objects List
The selected objects list shows the names and order of the objects that have been selected in the graphics window. In the above image, three circles have been selected and their names appear in the selected objects list. This provides addition feedback about what you are looking at in the graphics window. The selected objects list is also important for using the graphical interface for constructions that depend on what is selected.Selecting objects in the graphics window also affects the Scl code window. The Scl code for the last selected object is highlighted in the Scl code window. The window is automatically scrolled to make the line visible. The Scl code for "circle3" (the last one selected) is highlighted in the Scl code window.
Scl Command Input Window
The Scl command input window allows an arbitrary line of Scl input to be entered. A semicolon is automatically added to the end. Above is a picture of the Scl command input window with a constant value being entered. To enter text, click the mouse in the entry area and type a valid line of Scl. Some of the basic emacs-like bindings apply for editing. When done, press Return to evaluate the command.

Graphical Interface for Constructions
To the right of the shape3d standard viewing window is a graphical interface to Scl constructions. A picture of the graphical interface is shown to the right. There is currently only a bare minimum of constructions available graphically. Currently, points, anchors, lines, vectors and circles are supported by the graphical interface.These constructions require one or more objects to be selected as in the Construct menu. However, instead of choosing a menu item, you may simply click on the button in the graphical interface that corresponds to the desired constructor.
As with the Construct menu, the new object will automatically be shown in the viewing window and its Scl code will appear at the bottom of the Scl code window.
Constructors requiring text input in addition to the selected objects will bring up dialog boxes the same as with the Construct menu.
Below is a list of the c_shape_edit functions that correspond to each button in the graphical interface. The functions are listed from top to bottom in the same order as the buttons in the graphical interface. Each function is linked to the c_shape_edit function that it refers to. Click on the links for more information about argument number, argument types, etc.
Points Anchors Lines Vectors Circles
X Window Resources
X resources can be used to configure the appearance of various elements of the user interface of shape3d. The application name "shape3d" and class name "A1wish" can be used for these. See the X/Motif3 Resources documentation for details.
Alpha_1 User's Manual Home Page
Alpha_1 User's Manual. Version 98.01.
Copyright © 1998, University of Utah a1-web@gr.cs.utah.edu